Key Takeaways
- Leather wallets carry the unique story of their owner's life experiences.
- Repairing a leather wallet improperly can damage its natural patina and character.
- Effective repairs should preserve the wallet's history while enhancing its durability.
- Marcela, founder of Bull Guard, draws on extensive hands-on experience with leather wallets.
Table of Contents
- First Things First: Can This Leather Wallet Be Fixed, or Is It Time to Let Go?
- Know What You're Working With: Leather Types & Wallet Construction
- Clean Before You Fix: Safely Prepping a Leather Wallet for Repair
- Fixing Scratches, Scuffs, and Dryness: Bringing Leather Back to Life
- Cracks, Tears, and Peeling: What You Can Fix, and What You Can Only Disguise
- Stitching, Edges, and Linings: Structural Fixes That Make a Wallet Useful Again
How to Fix a Leather Wallet (Without Ruining Its Character)
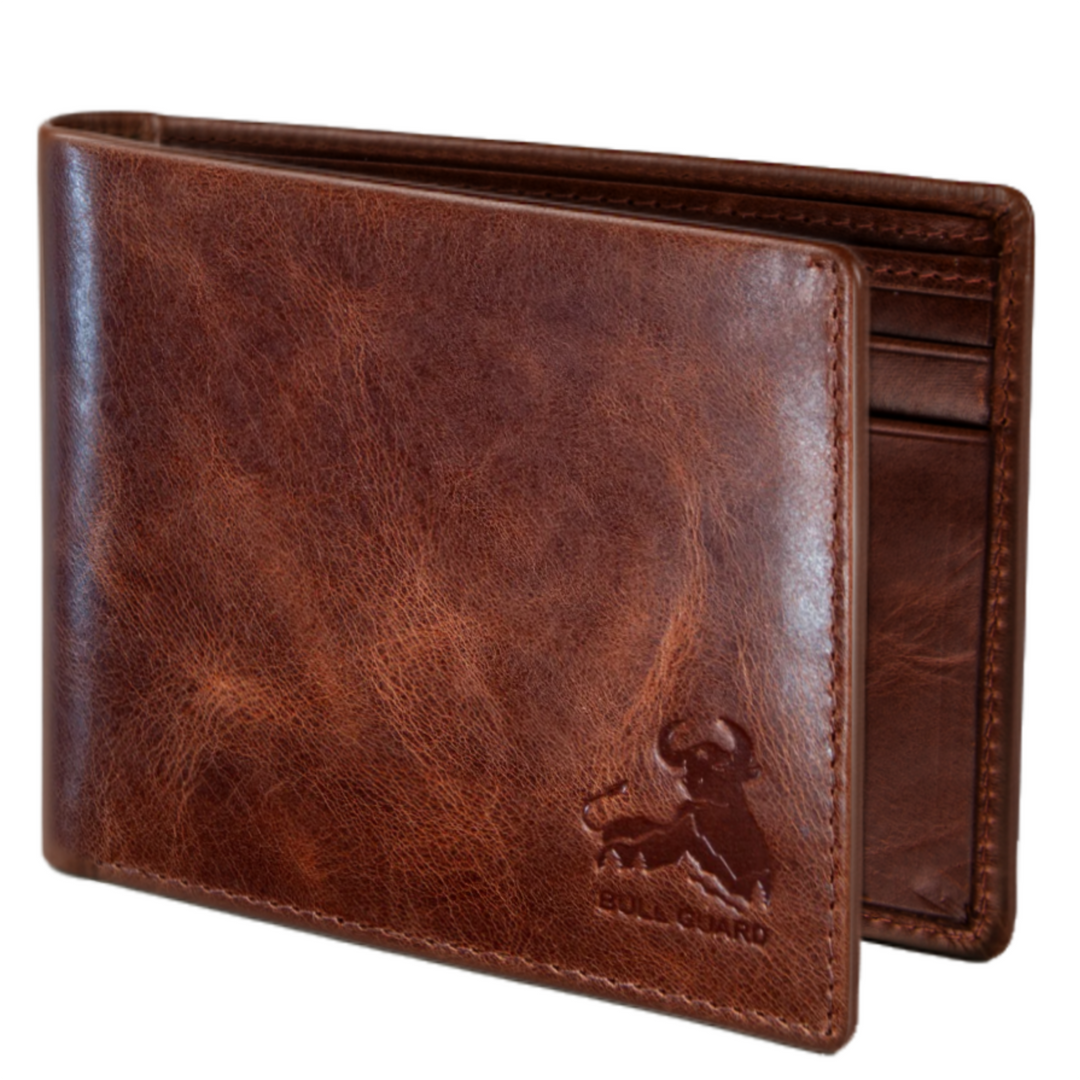
Your leather wallet tells the story of every adventure, every late night, every moment it's carried you through life. When cracks appear along the fold or the corners start showing wear, the instinct is to fix leather wallet damage quickly, but the wrong approach can strip away years of beautiful patina and character. I'm Marcela, founder of Bull Guard, and after sketching, crafting, and road-testing hundreds of leather wallets across city streets and mountain trails, I've learned that the best repairs honor the journey your wallet has taken while giving it strength for the miles ahead.
The secret isn't erasing every mark, it's stabilizing the leather, restoring flexibility, and preserving that rich patina that only comes from being truly lived in. Whether you're dealing with surface scratches, deeper cracks, or structural damage, the right technique can add years to your wallet's life without making it look like a factory-fresh imposter. For those seeking a more compact option, the Slim Leather Wallet offers durability and timeless style.
First Things First: Can This Leather Wallet Be Fixed, or Is It Time to Let Go?
Cosmetic vs. Structural Damage (Why It Matters for Any Repair)
Cosmetic damage includes surface scratches, scuffs, light stains, and dryness, issues that affect appearance but leave the wallet's function intact. These typically improve 60-90% with proper conditioning and targeted treatment. Structural damage involves torn folds, split seams, severely warped bodies, or card slots stretched beyond use.
The distinction matters because cosmetic work alone on structural damage fails within weeks. A cracked fold needs stabilization before conditioning, or the crack will simply reopen with the first few uses. Understanding this difference saves you from wasting time on temporary fixes.
Reading the Leather's Story: Age, Patina, and Limits of Repair
A 1-3 year old wallet that's dried but intact usually responds beautifully to reconditioning, regaining most of its original softness. A 10-year veteran with deep fold cracks tells a different story, you can stabilize and soften those cracks, but you're bridging broken fibers, not regrowing them.
This isn't failure; it's honoring the wallet's journey. Some of my favorite Bull Guard wallets show gentle stress lines at the fold after years of daily carry. These marks represent thousands of transactions, countless adventures, and the gradual shaping that only quality leather achieves through real use. If you're interested in a wallet that stands the test of time, consider the Classic Leather Trifold for its enduring construction.
Know What You're Working With: Leather Types & Wallet Construction

Full-Grain vs. Top-Grain vs. "Genuine": What Changes in Repair
Full-grain leather keeps its natural surface intact, developing rich patina and responding exceptionally well to reconditioning. Top-grain leather has a slightly sanded surface that still repairs beautifully, though color work may show slight variations. "Genuine" leather spans a wide quality range, some pieces condition well, while others with heavy synthetic coatings may only accept surface treatments.
Think of it like restaurants: the "cut" (full-grain, top-grain) matters, but the "chef" (tannery), ingredients, and preparation determine how well the leather ages and accepts repair. Two wallets labeled identically can perform completely differently based on the tannery's expertise and finishing process.
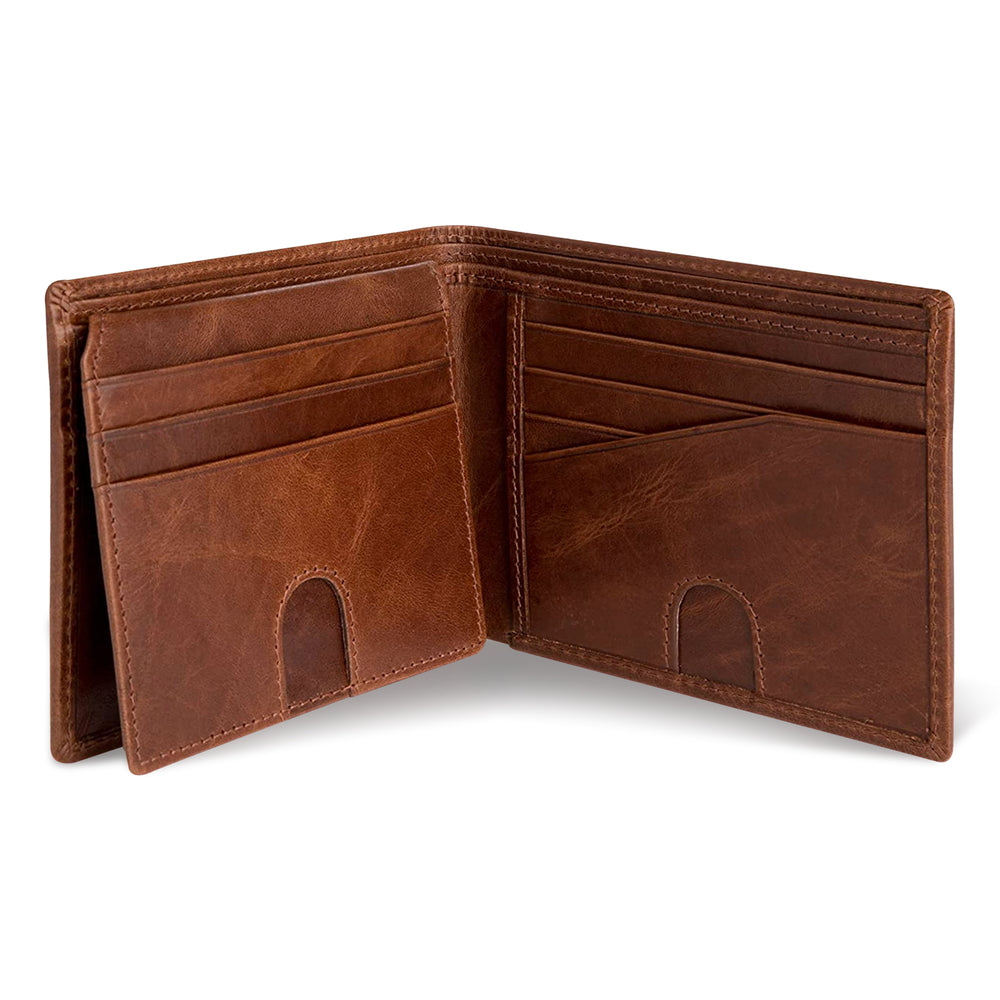
Wallet Anatomy 101: Where Repairs Usually Fail First
The spine experiences the most bending stress, making it prone to cracks and tears. Corners and edges face constant friction, leading to worn burnishing and edge paint failure. Card slots stretch from overstuffing, while bill compartment linings tear from sharp objects and repeated folding.
Understanding these stress points helps target the right repair technique. A corner scuff needs different treatment than a fold crack, and knowing the anatomy prevents you from applying heavy conditioning to areas that need structural reinforcement first. For those who prefer a minimalist carry, a Slim Card Case can help reduce wear and tear on your essentials.
How RFID Linings, AirTag Slots & Inserts Affect Repair Choices
RFID-blocking wallets contain thin metallic mesh or foil layers that provide electronic pickpocketing protection. Avoid deep needle passes or heavy adhesives that could damage these protective layers. Keep water and liquid cleaners to light, controlled applications around AirTag compartments and metal cores.
Removable inserts offer repair flexibility, you can work on them separately or even replace them entirely without disturbing the main wallet structure. This modular approach often extends the overall life of a quality RFID wallet significantly. If you're looking for a wallet with modern features, the Airtag Leather Card Holder Wallet for Men is a great choice.
Clean Before You Fix: Safely Prepping a Leather Wallet for Repair
Dry Prep: Empty, Dust, and Inspect (5-Minute Step You Shouldn't Skip)
Remove everything, cards, cash, photos, AirTags, receipts, so you can see the full extent of damage. Gently dust seams and pockets with a soft brush or microfiber cloth, paying attention to corners where lint accumulates. Mark problem areas with removable tape or snap a photo on your phone for reference during repair.
This inspection often reveals damage you missed during daily use. A card slot that seemed fine might show stress cracks when empty, or you might discover that mysterious stiffness comes from a hidden ink stain rather than dried leather. For a detailed guide on cleaning, see how to clean a leather wallet.
Choosing the Right Cleaner: pH-Balanced vs Alcohol-Based
pH-balanced leather cleaners handle routine grime and prep work without disrupting the leather's natural oils. Reserve diluted isopropyl alcohol (50-70%) for spot work on tough stains like ink, and always follow with conditioning. Never use household detergents, vinegar soaks, or baby wipes with alcohol and fragrance, these can strip protective oils or leave residues that interfere with repair products.
Step-by-Step: How to Clean a Leather Wallet in 10-15 Minutes
Dampen a microfiber cloth slightly, not dripping wet. Apply a pea-sized amount of cleaner to the cloth, never directly to the wallet. Work in small circles covering 5-10 cm areas for 10-20 seconds each, then wipe off residue with a second, dry cloth. Allow 15-30 minutes of air drying away from direct heat or sunlight before proceeding with repairs.
This methodical approach prevents over-wetting and ensures even cleaning. Rushing this step often creates water spots or uneven conditioning later, especially on absorbent leathers like full-grain varieties.
Special Cases: Removing Surface Stains Before Deeper Repair
For light water spots, gently dampen the surrounding area to even out the mark, then let dry completely before conditioning. Fresh oil or grease requires immediate action, within 5-10 minutes, blot (never rub) with paper towel, then apply cornstarch or talc for 2-3 hours before brushing off. Ink marks respond to careful dabbing with a cotton swab and tiny amount of alcohol for 3-5 seconds, repeated sparingly. For more tips, check out how to clean wallet leather.
Fixing Scratches, Scuffs, and Dryness: Bringing Leather Back to Life
Light Surface Scratches: When a Simple Conditioning Pass Is Enough
Apply a pea-sized amount of quality conditioner to your fingertip or cloth, then work over the scratch in small circles for 30-60 seconds. Let sit for 5-10 minutes, then buff with a dry cloth. This technique rehydrates compressed fibers and darkens them slightly, blending shallow marks into the surrounding leather.
The key is patience, many scratches that look permanent disappear completely after proper conditioning. I've seen 5-year-old Bull Guard wallets with apparent "damage" that vanished entirely with this simple treatment.
Deeper Scratches and Gouges: Filling and Blending Without Overdoing It
Leather filler works best for deeper gouges on firm leathers, while beeswax-based balms handle shallow-to-medium scratches on rugged finishes like Crazy Horse. For filler, apply a match-head-sized amount with a small spatula, level it, dry for 20-30 minutes, then lightly sand with very fine sandpaper (1000-2000 grit) before recoloring if needed.
Beeswax balm offers a simpler approach: warm it between your fingers, press into the scratch, and buff after 2-3 minutes. This method works particularly well on pull-up leathers that naturally show and heal minor damage through use.
Reconditioning a Dried-Out, Stiff Wallet So It Softens Safely
Gradual rehydration prevents over-saturation that can weaken leather fibers. Apply a thin layer of conditioner over the entire wallet, focusing on the fold and corners, then let absorb overnight for 8-12 hours. If still stiff, apply another light coat, then gently flex the wallet 5-10 times along its natural fold.
Watch for warning signs, leather that feels mushy or oily indicates too much product. If this happens, pause and let the wallet normalize for several days. Quality leather like what we use in Bull Guard wallets typically needs only light conditioning to restore flexibility. For more on the science of leather care, visit leather care.
Faded Color and Dull Finish: When Conditioning Alone Isn't Enough
Distinguish between dry/dull leather (restored with conditioner and cream polish) and true fading (requires color restorer or dye). For dullness, cream polish in a color close to your wallet works wonders, apply 2-3 thin layers, drying 10 minutes between each, then buff to a subtle sheen that enhances rather than masks the natural leather character.
Cracks, Tears, and Peeling: What You Can Fix, and What You Can Only Disguise

Stitching, Edges, and Linings: Structural Fixes That Make a Wallet Useful Again
How to Restitch a Leather Wallet by Hand (Even on Older Holes)
Use waxed polyester thread, two harness needles, and an awl for best results. If existing holes aren't torn, reuse them. For new holes, space them 2-3 mm from the edge and 3-4 mm apart. Measure thread at three times the stitching length to ensure adequate working material.
Work slowly with saddle-stitch technique, pulling each stitch tight without "sawing" the leather. For worn holes, shorten stitch length slightly to anchor in stronger material. This hand-stitching approach often proves more durable than the original machine stitching, especially on quality leather. If you want a wallet that can withstand daily use, explore our durable leather wallet for everyday use recommendations.
Repairing and Repainting Frayed Wallet Edges
Lightly sand the edge with 600-800 grit sandpaper to remove loose paint and create adhesion. Clean away dust, then apply the first thin layer of edge paint with a small brush or applicator. Let dry 20-30 minutes before applying 1-2 more thin coats, lightly sanding between if needed.
For high-stress edges, consider adding a row of stitching 2-3 mm from the edge before repainting. This prevents future fraying and creates a more professional appearance. Quality edge finishing separates well-made wallets from cheap alternatives. For a wallet with extra organization, the Bifold with Flip Up ID is a practical solution.
Frequently Asked Questions
How can I tell if my leather wallet has cosmetic damage or structural damage, and why does this distinction matter for repairs?
Cosmetic damage includes surface scratches, scuffs, light stains, and dryness that affect appearance but not function, while structural damage involves torn folds, split seams, or severely warped areas that impact usability. This distinction matters because cosmetic issues can often be improved with conditioning, but structural damage requires stabilization to prevent quick failure; treating structural damage as cosmetic leads to short-lived fixes.
What are the best methods to repair cracks and tears in a leather wallet without damaging its natural patina?
The best approach is to stabilize cracks and tears using gentle stitching or leather-specific adhesives, followed by conditioning with products designed for leather to restore flexibility. Avoid harsh chemicals or heavy refinishing that strip the wallet’s natural patina; the goal is to preserve the lived-in character while reinforcing durability for continued use.
How do different types of leather, such as full-grain versus top-grain, affect the repair process and durability of a wallet?
Full-grain and top-grain leathers differ in hide selection and finishing, influencing texture and aging, but repair methods focus on the leather’s condition and tanning quality rather than the label alone. Both types require careful cleaning, conditioning, and structural repair to maintain durability; understanding the tannery and leather preparation helps guide effective restoration rather than relying solely on leather grade.
What steps should I take to properly clean and prepare my leather wallet before attempting any repairs?
Begin by gently removing surface dirt with a soft cloth or brush, then use a leather-safe cleaner to avoid harsh chemicals that can dry or damage the leather. Allow the wallet to dry naturally away from heat, and only then apply conditioners or repair materials to ensure the leather is clean, flexible, and ready for effective restoration without compromising its patina.